Preset for the Outlook email feature can be defined for all kinds of Outlook emails (new, reply). Learn more about the configuration process below.
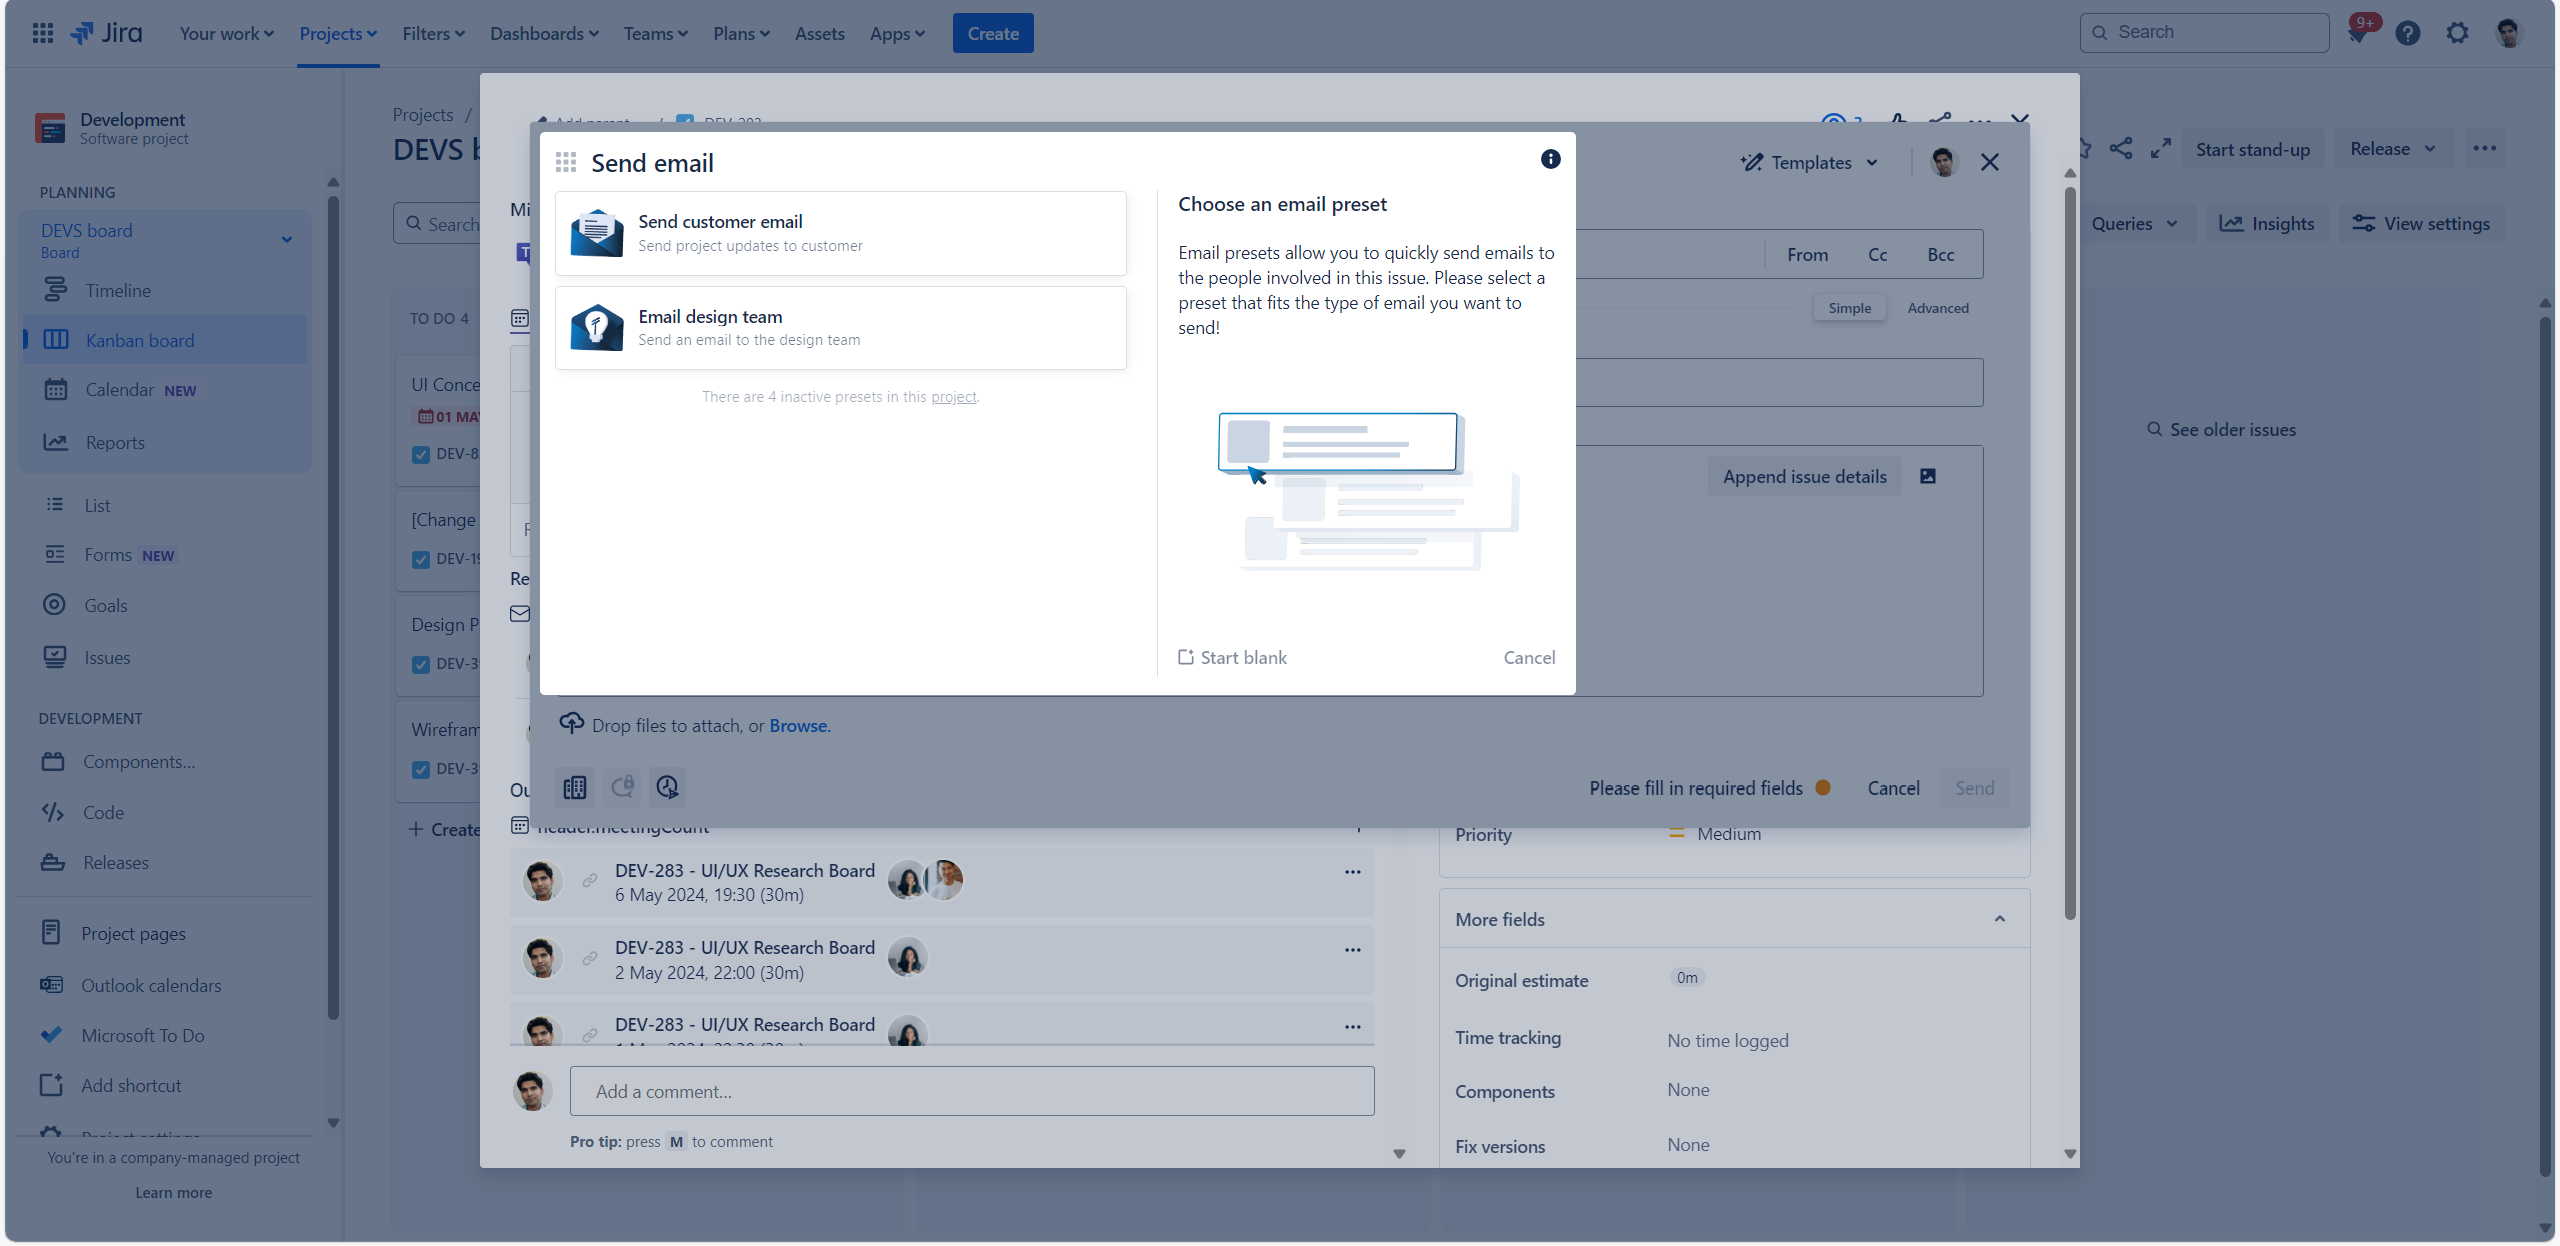
Configure a Preset for Emails
Click through this short demo to configure a Preset for your Outlook emails.
Preset settings
Preset blueprints

You can create presets from scratch (first two options) or from a preconfigured blueprint (see options below under “recommendations”). Blueprints are available for specific use cases, such as incident management and internal ticketing.
Email Preset blueprints provide pre-filled configuration options for:
-
Sender & participants
-
Subject & body of the email (message)
-
Priority & receipts
-
Access options (sharing)
-
Dialog configuration (e.g. advanced mode)
-
Built-in automations
You can adjust or accept these options.
When creating a Preset, you can choose between a JSM or Jira project. Configuration options differ based on the Preset type.
Preset framework
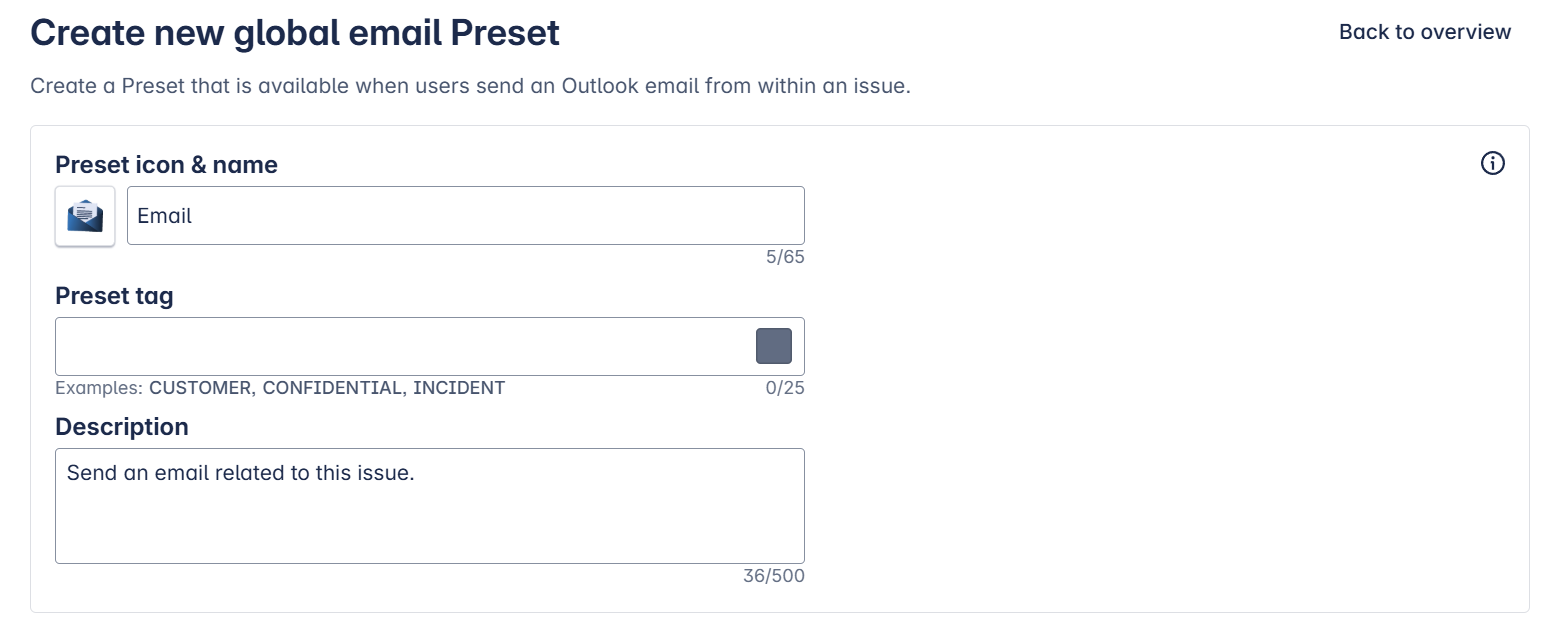
Framework settings
not editable by the user
When selecting a Preset option, decide on a name & icon, a tag and add a short description.
|
Preset icon & name |
Choose a specific name and icon so that users understand the usage of the Preset. |
|
Preset tag |
Use tags e.g. “internal” / “external” / “sensitive” etc. to categorize the Preset for the user. |
|
Preset description |
Be as precise as possible to distinguish easier among your Presets. |
Email settings
To access sender or recipients data, you must log in with your Microsoft 365 account via this button on the bottom of the page. ![]()
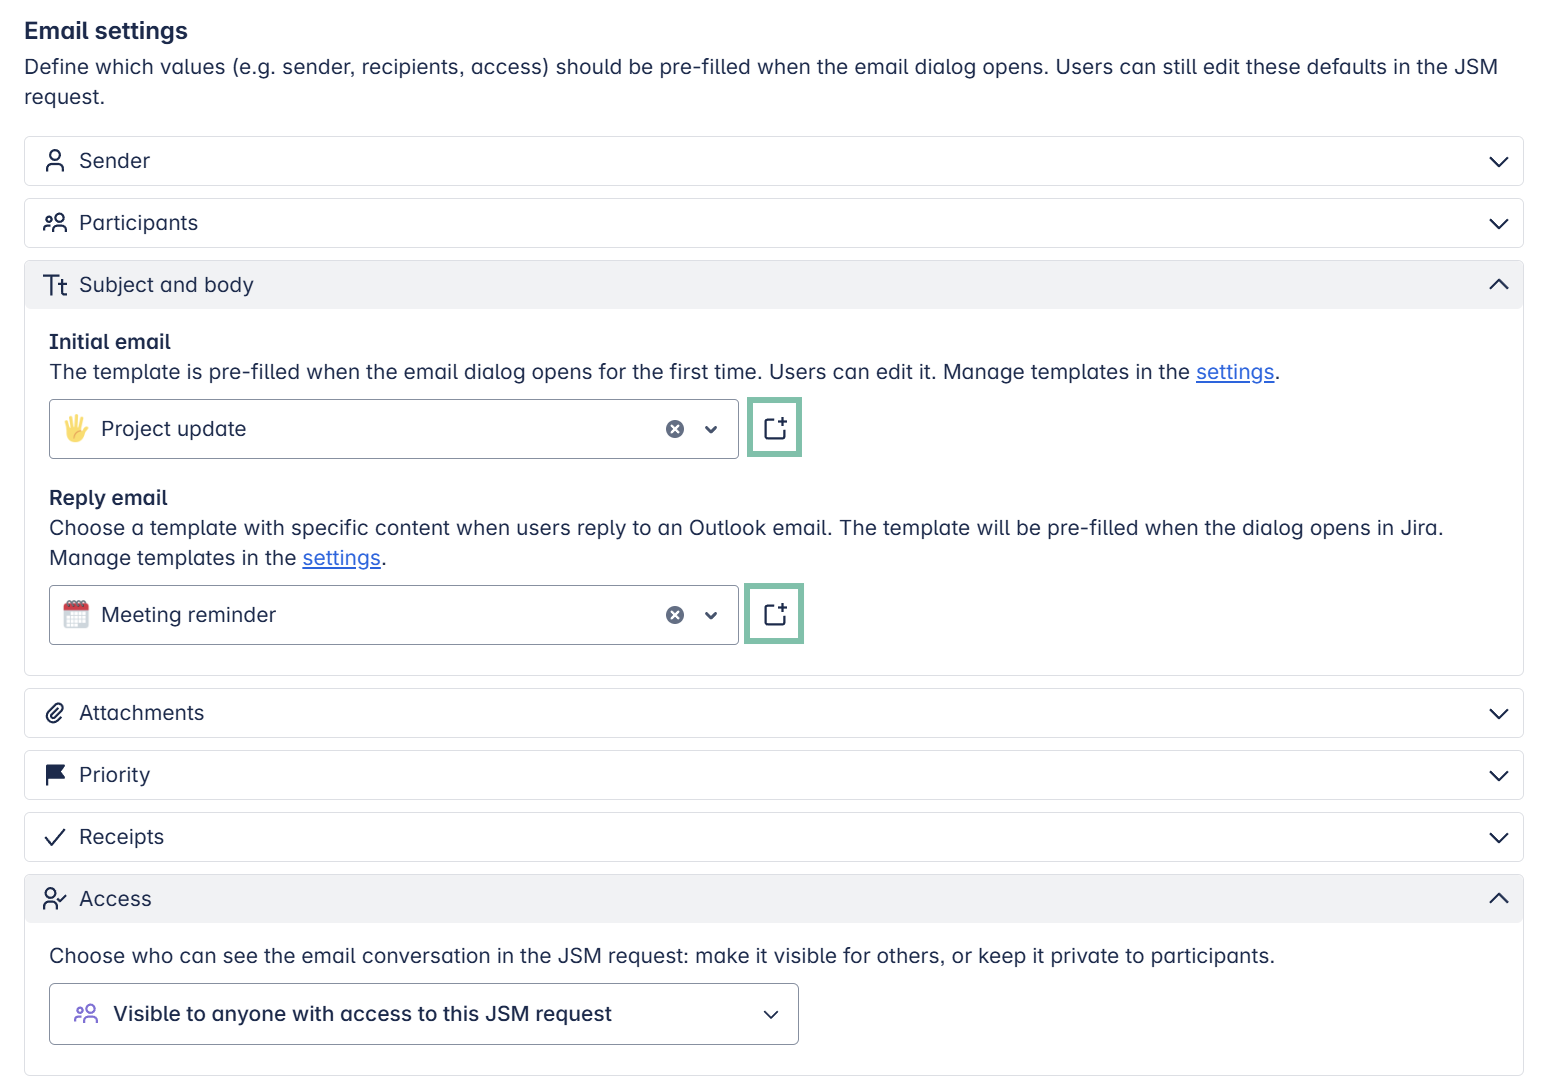
Set defaults
editable by the user
Decide on the default sender, participants and subject & body of the email (based on templates). Adjust even more options to your needs such as attachment handling and access options.
The user can edit settings in Jira, if required.
|
Sender
|
Choose a sender of the email, if the mail should be send on behalf of another user or shared mailbox: Set-up a shared mailbox here. |
|
Participants |
Choose, “to” whom the email should be send, as well as who should be in “CC” and or “BCC”. Static user: Search by email for a required persons.
|
|
Subject and body |
Choose among created email templates which content should be prefilled when choosing a Preset in Jira. Create a global Preset:
Create a project specific Preset:
Create a new template:
|
|
Attachments |
Decide on whether to include all Jira attachments when sending new or replying to existing emails from Jira. |
|
Priority |
Choose a priority of the email being sent. |
|
Receipts |
Delivery receipt: Receive a confirmation when the email is received. Read receipt: Receive a confirmation when the email is opened. |
|
Access
|
Decide whether to share the content of the email with every user having access to the issue or to keep it private. |
Dialog configuration
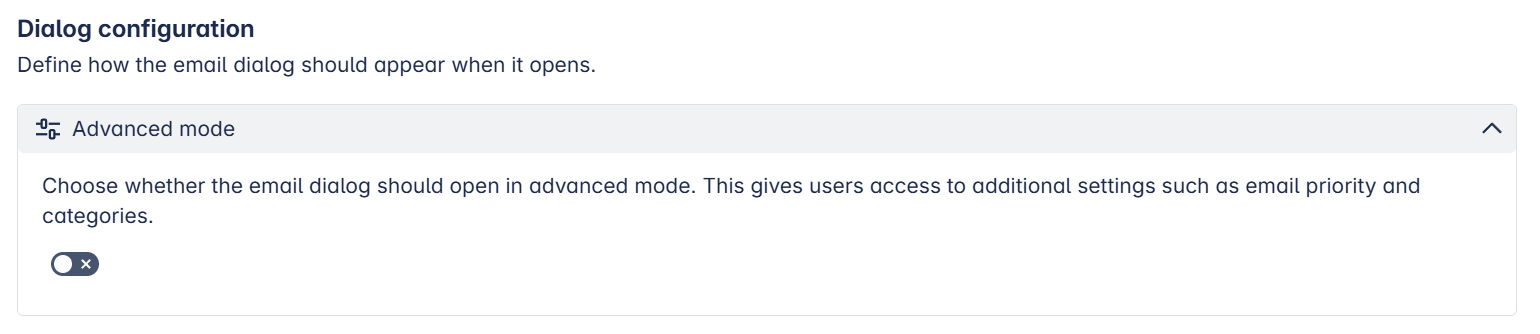
Dialog settings
not editable by the user
Decide, if the email dialogue should open in advanced mode to e.g. decide on priority and categories.
Built-in automations
not editable by the user
Choose from built-in automations that integrate Microsoft 365 features with Jira and make workflows more efficient in Jira and/or JSM projects. No manual setup is required. These settings are active throughout the email’s lifecycle and are not running into any automation run limits.
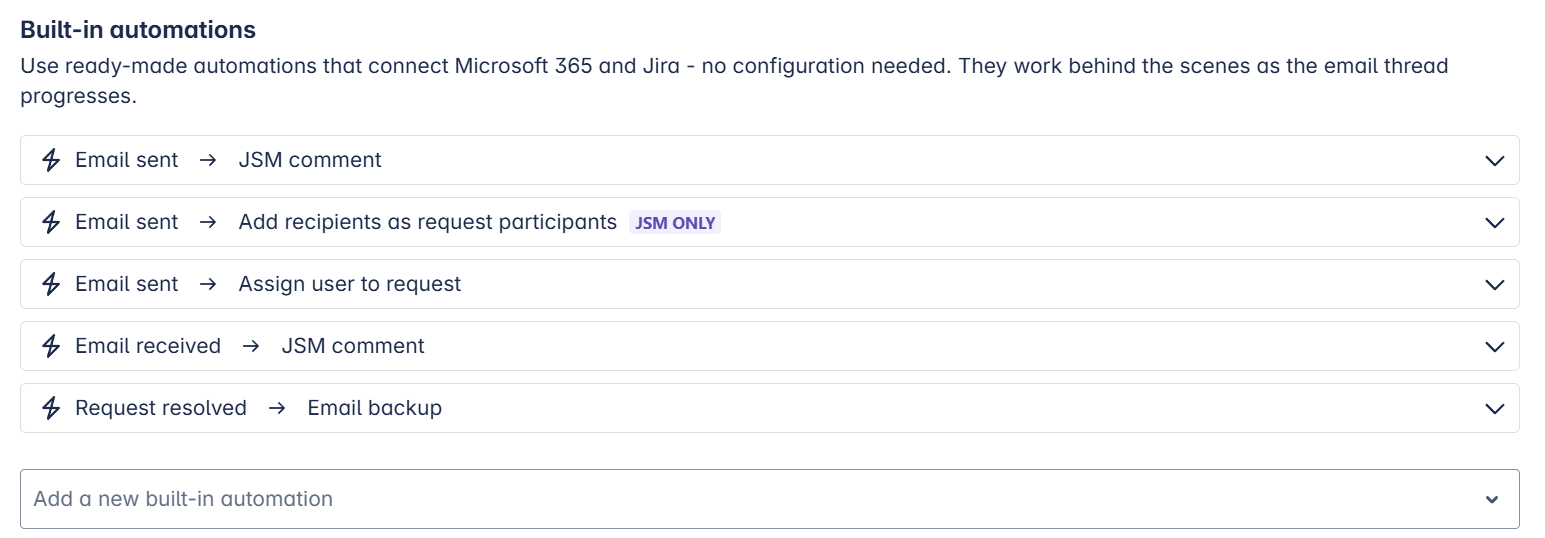
JSM projects
|
|
|
Email sent
|
Attach a comment to the request, when a new email is sent. All involved persons will be notified via email. Jira comment visibility:
|
|
Email sent
|
Choose from drop down menu: 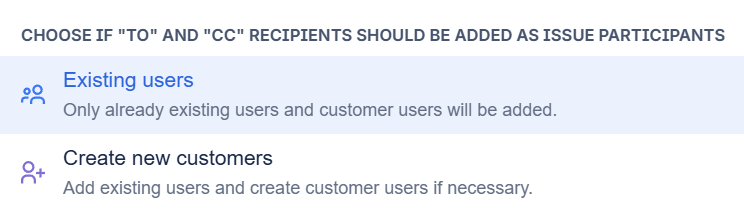
|
|
Email sent
|
The user will automatically be assigned to the issue, if they send a new email from it (provided that the user has permissions to assign themselves). |
|
Email received
|
Attach a comment to the request, when a new email is sent. All involved persons will be notified via email. Jira comment visibility:
|
|
Request resolved
|
After resolution of the request, a backup of all shared emails is attached to the JSM request in the form of a .*zip file containing every email as an *.eml file. Choose among language options. 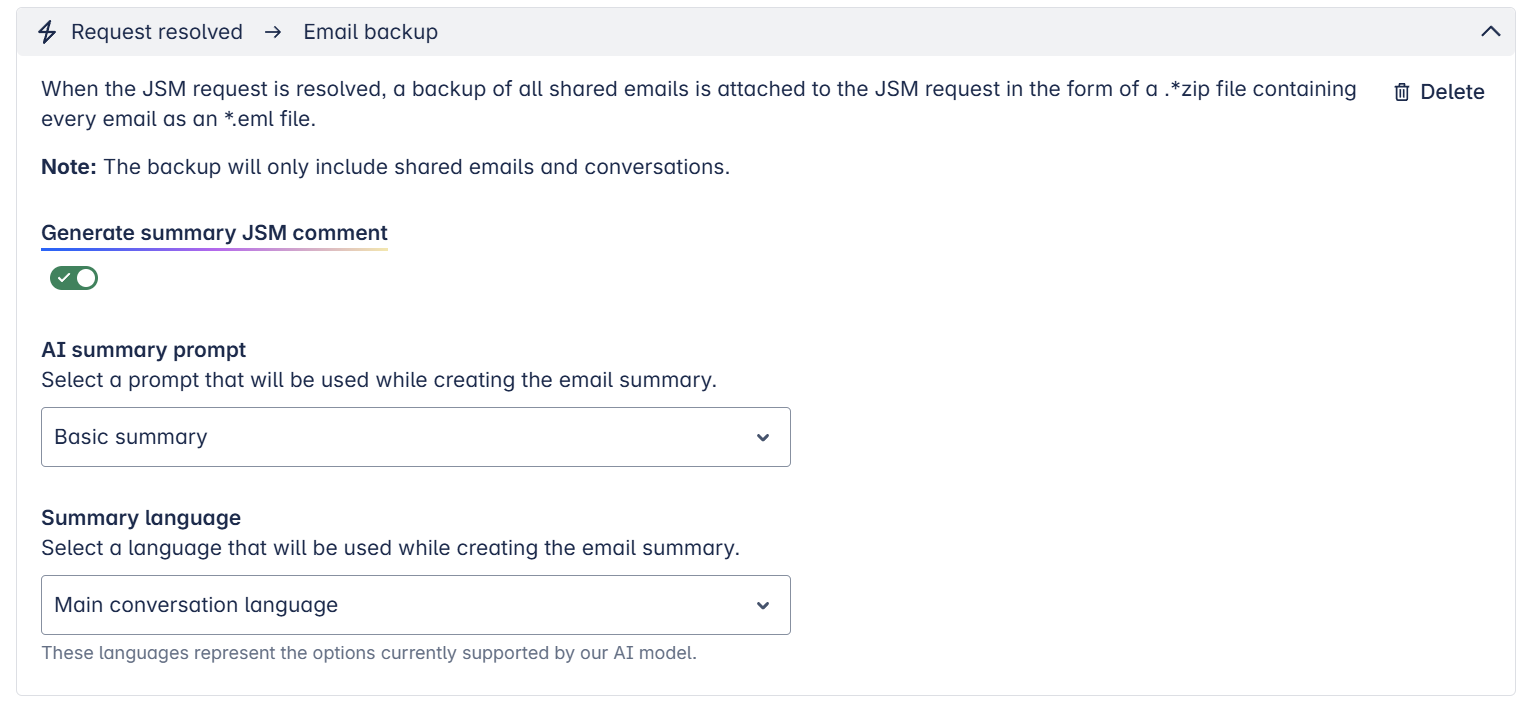
|
|
project specific
|
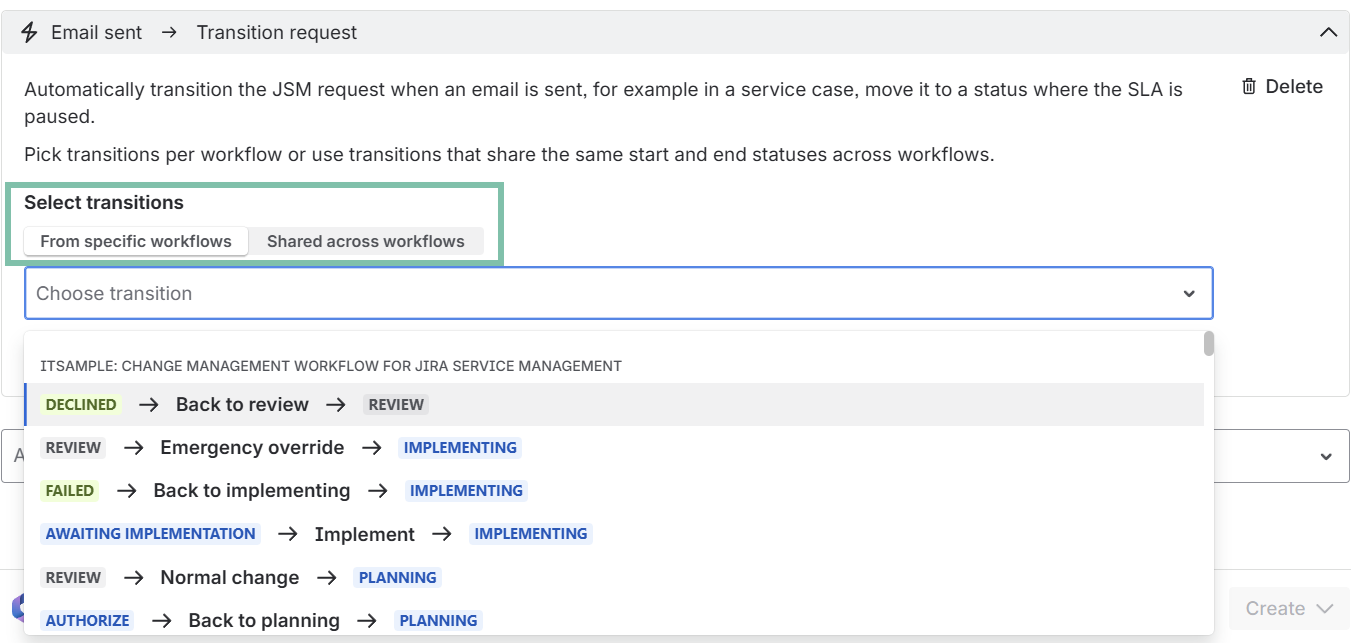
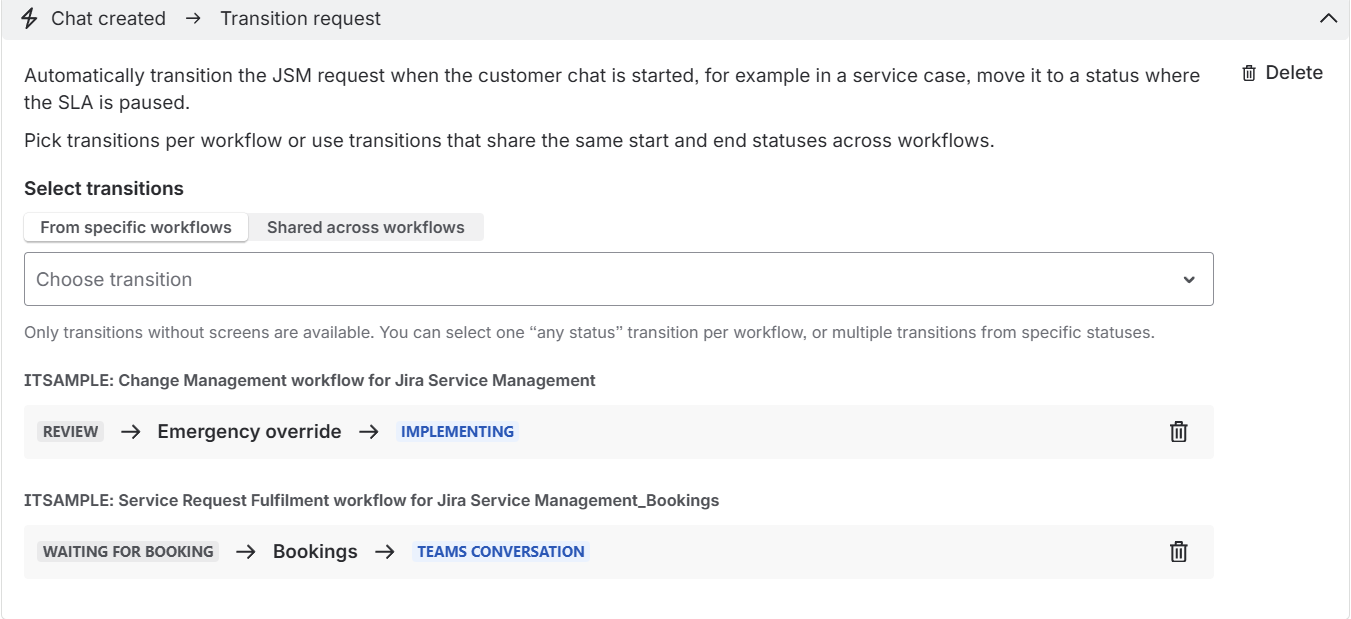
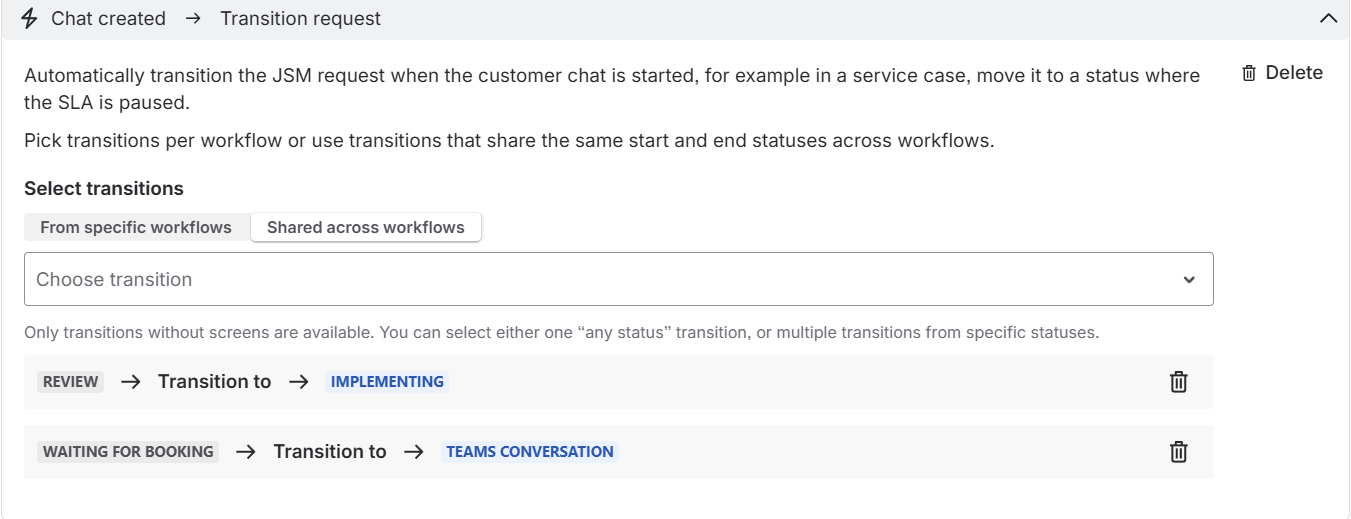
When an email linked to a JSM request is sent, the rule triggers a predefined workflow transition on that request. Choose which transitions to use when the email has been sent/received. You can:
Please note:
|
Jira projects
|
|
|
Email sent
|
Attach a comment to the work item, when a new email is sent. All involved persons will be notified via email. |
|
Email sent
|
The user will automatically be assigned to the issue, if they send a new email from it (provided that the user has permissions to assign themselves). |
|
Email received
|
Attach a comment to the work item, when a new email is sent. All involved persons will be notified via email. |
|
Work item resolved
|
After resolution of the work item, a backup of all shared emails is attached to the JSM request in the form of a .*zip file containing every email as an *.eml file. Choose among language options 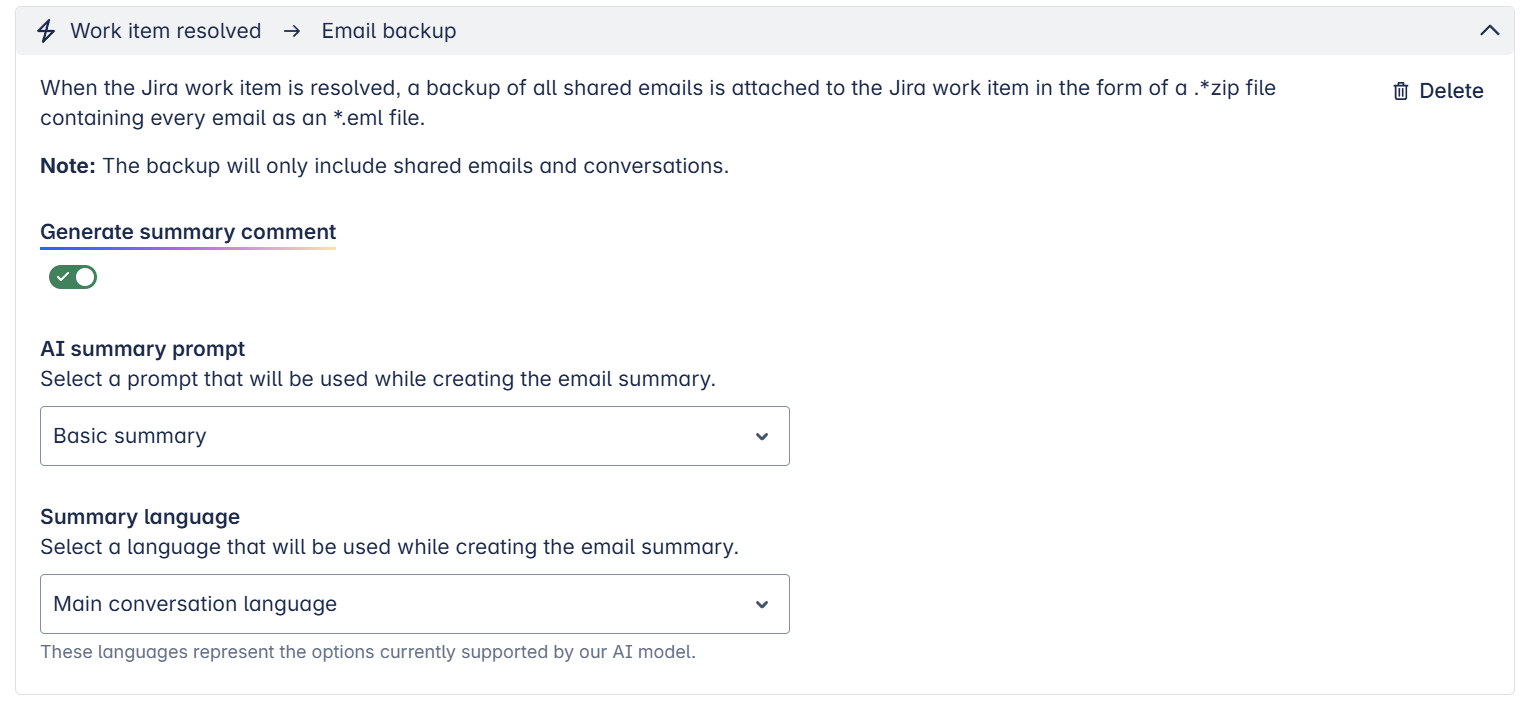
|
|
project specific
|
When an email linked to a Jira work item is sent, the rule triggers a predefined workflow transition on that request. Choose which transitions to use when the email has been sent/received. You can:
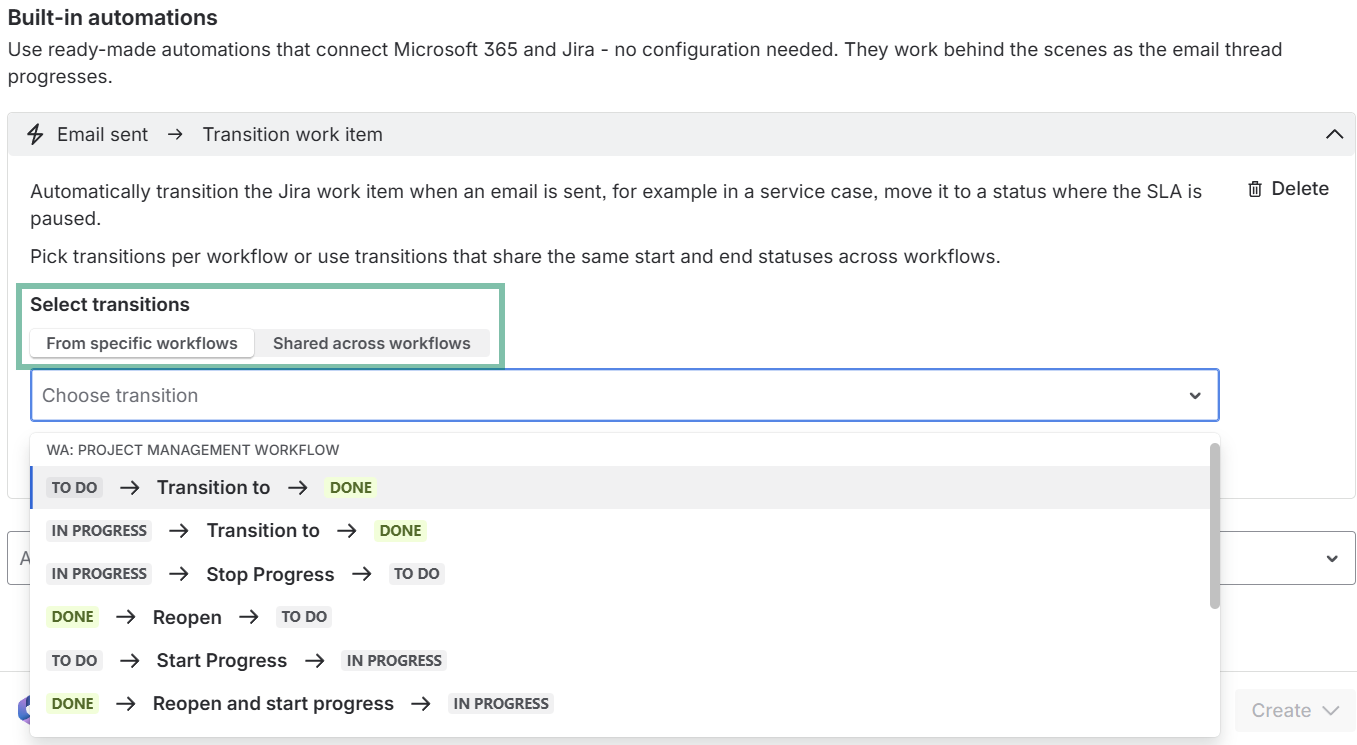
Please note:
|
Built-in automation: Transition request/work item
The following explanation is based on the Teams preset.
-
Select one or more transitions from specific workflows and have them also listed in the shared across workflows tab, if the selected ones also exist in other workflows.
-
Start by selecting transitions which are shared across workflows. Switch to the tab for specific workflows to see all workflows containing the selected transition. Delete or keep transitions, if desired.
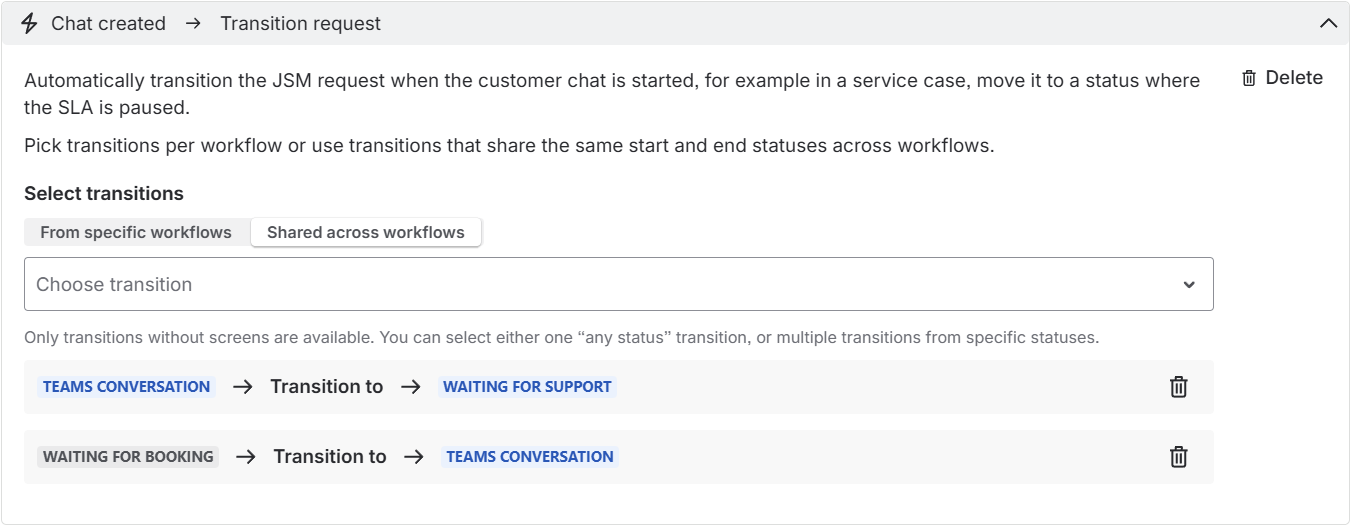
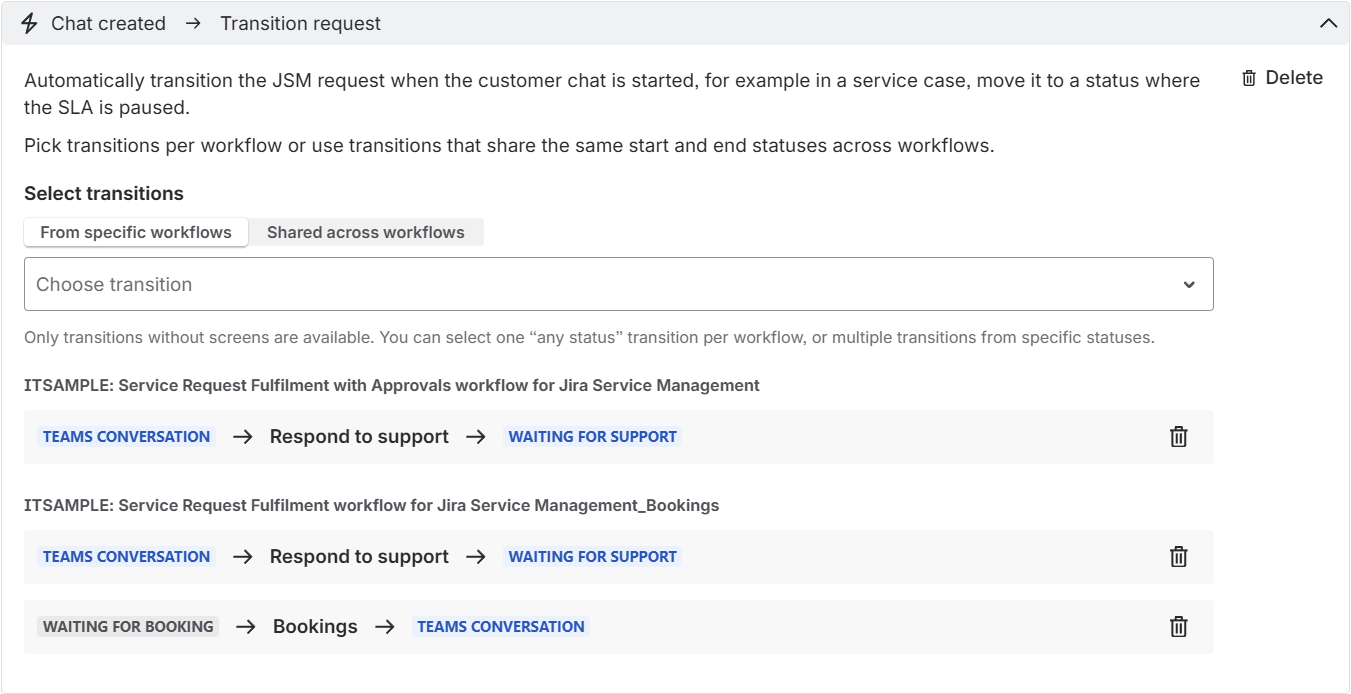
Please note:
Whenever there is an “any status”-transition selected, no other transition can be selected in this workflow.
If you want to set up more advanced Jira automation rules with Microsoft 365, click here.
Finish set-up

Create Preset
not editable by the user
When finishing the set-up of the Email Preset, you can decide between different activation options.
|
Create only |
Create the Preset and it will be available in the admin / project settings in Jira. It needs to be manually activated via the settings. |
|
Create + activate globally |
Create and activate the Preset and it is automatically active in all Jira projects with no project-specific settings. 📌 Please note: If there are project specific settings, the project admin still needs to activate the Preset manually via the project settings. |
|
Create + force activation |
Create and activate the Preset and it is automatically active in all Jira projects regardless of project-specific settings. 📌 Please note: Project specific settings will be overridden and the Preset will automatically be available and selectable in the Jira issue. |