If you primarily use Jira Service Management, consider embedding your Jira Service Management (JSM) customer portal directly within Microsoft Teams. This integration allows your customers to easily raise new requests without having to leave the Microsoft Teams environment.
First, activate our Teams feature by following the instructions provided in the Getting Started guide. After that, proceed to install the Teams portal app within Microsoft Teams. The installation process is straightforward and can be completed in just a few steps by adhering to the instructions available in the admin settings.
Ensure that you have your Jira and Microsoft Teams administrators available.
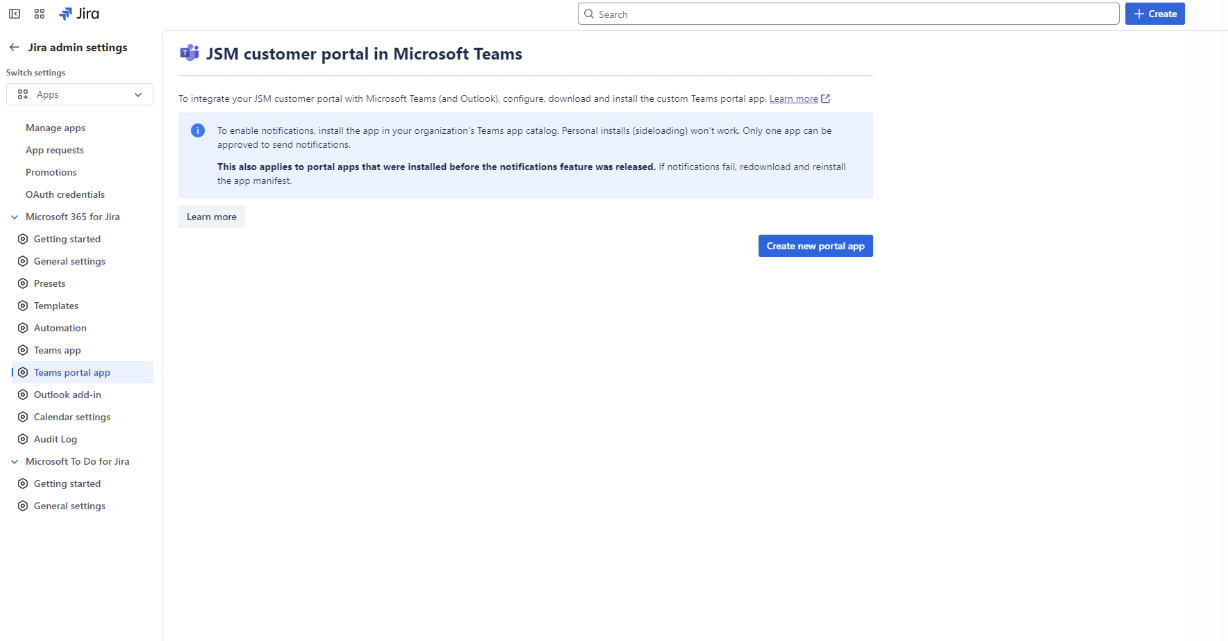
Install Teams portal app
The installation & deployment follows the same way for Jira Cloud and Data Center.
Who is in charge
The table below provides an overview of admin responsibilities and actions to set-up the Teams portal app for your team.
|
Step |
Responsibility |
Action |
|---|---|---|
|
1 |
jira admin |
Sets-up the customer portal in Jira. |
|
2 |
jira admin |
Edits the customer portal for the deployment in Microsoft Teams. |
|
3 |
jira admin |
Downloads the custom app (.zip file). This file needs to be uploaded in Microsoft Teams as Teams portal app. |
|
4 |
MS Teams admin |
Deploys the Teams portal app in Microsoft Teams / upload .zip file.
|
|
5 |
jira admin &
|
Following the deployment, notifications must be “authorized” by the Microsoft Teams administrator (refer to: authorize notifications). |
Set-up guide
The demo below shows you how to install and deploy the Teams portal app for your team, starting from the Jira admin settings and finishing in Microsoft Teams.
As mentioned above, the Jira and Microsoft Teams admin need to take action to provide an accurate deployment.
Upon completing the deployment in Microsoft Teams, the Jira admin must authorize notifications in Jira. However, these notifications require an approval from the Microsoft Teams admin. For further details, please refer to the section below.
In case you want to learn more about general concepts of apps in Microsoft Teams, we recommend reading the official Microsoft documentation.
Please note: If you are a Microsoft Teams admin, but not an active Teams user, the app icon might not display correctly.
Authorize notifications
In cases where the Jira administrator is not the Microsoft Teams administrator, the notifications require approval from the Microsoft Teams admin via the link that appears when clicking on “authorize.”
-20250730-095434.png?cb=f94be60008a2b355d6c803faef5d0c97)
Why notifications?
To allow our customer portal bot to send updates on related work items into linked customer chats, notifications must be enabled.
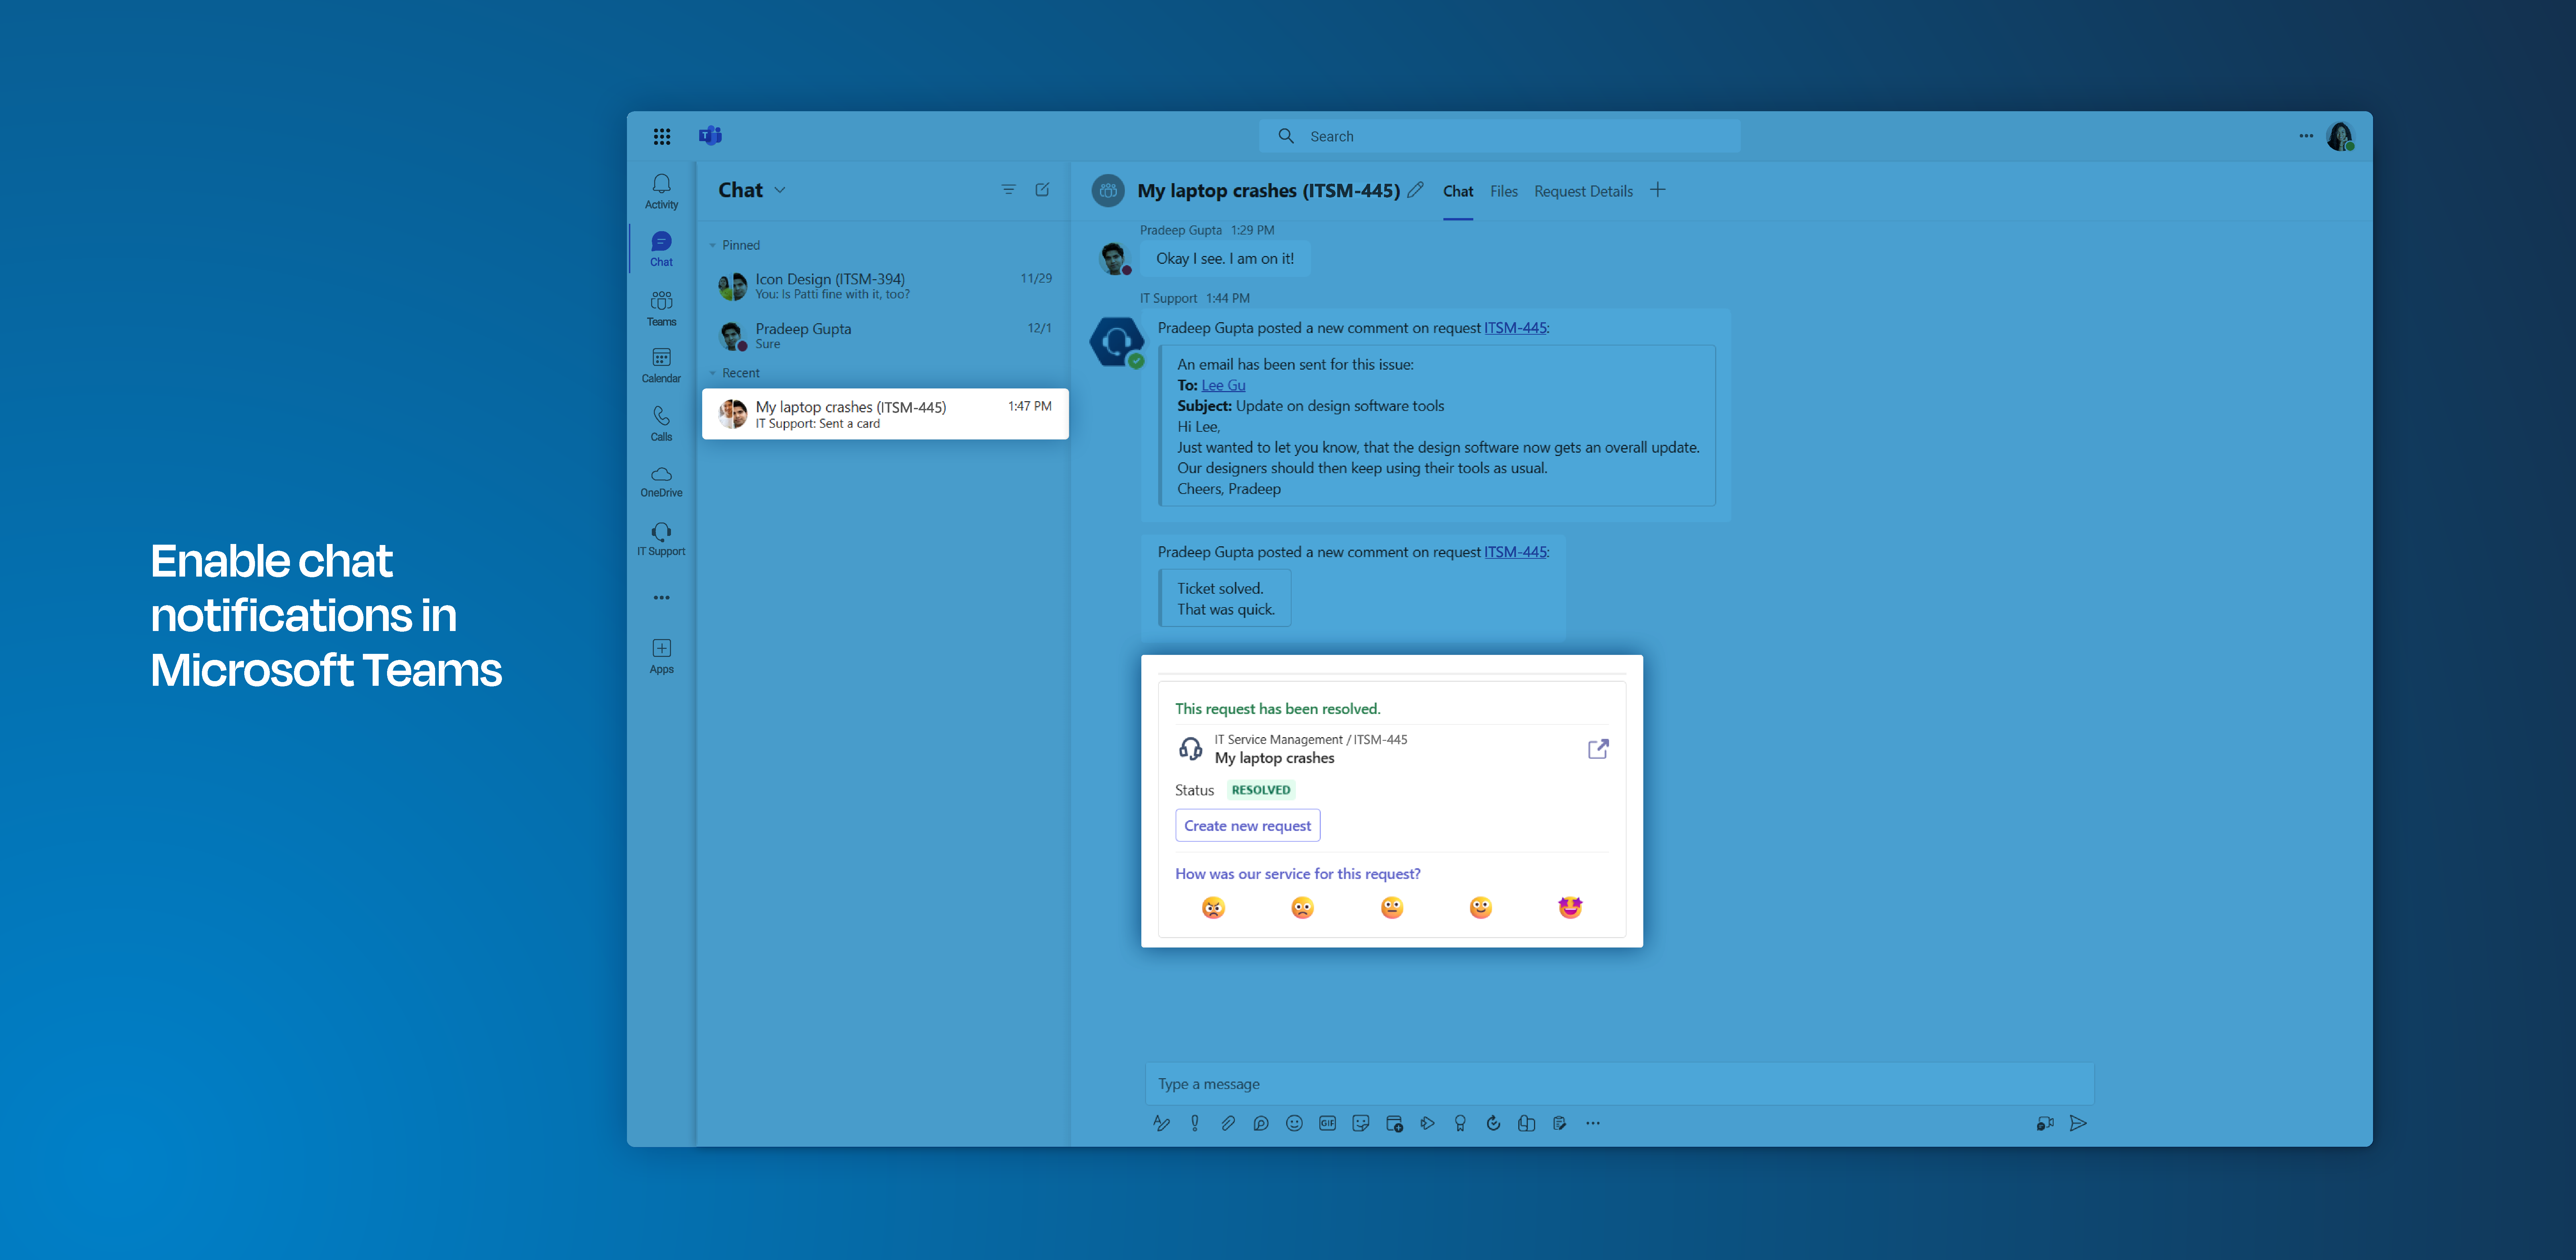
Customer notifications can be customized in greater detail using our Microsoft Teams chat Presets. Furthermore, you can add request notifications in your specific JSM project.
-
Through Microsoft Teams chat Presets, you can set up customer notifications to be sent either via our Smart Connect app or via the customer portal app into a work item-related chat. Select the appropriate app based on the type of updates you wish to share in the corresponding customer chat.
-
Through request notifications, you can set up additional notifications, including updates that are shared directly in the bot chat within Microsoft Teams.
Benefits
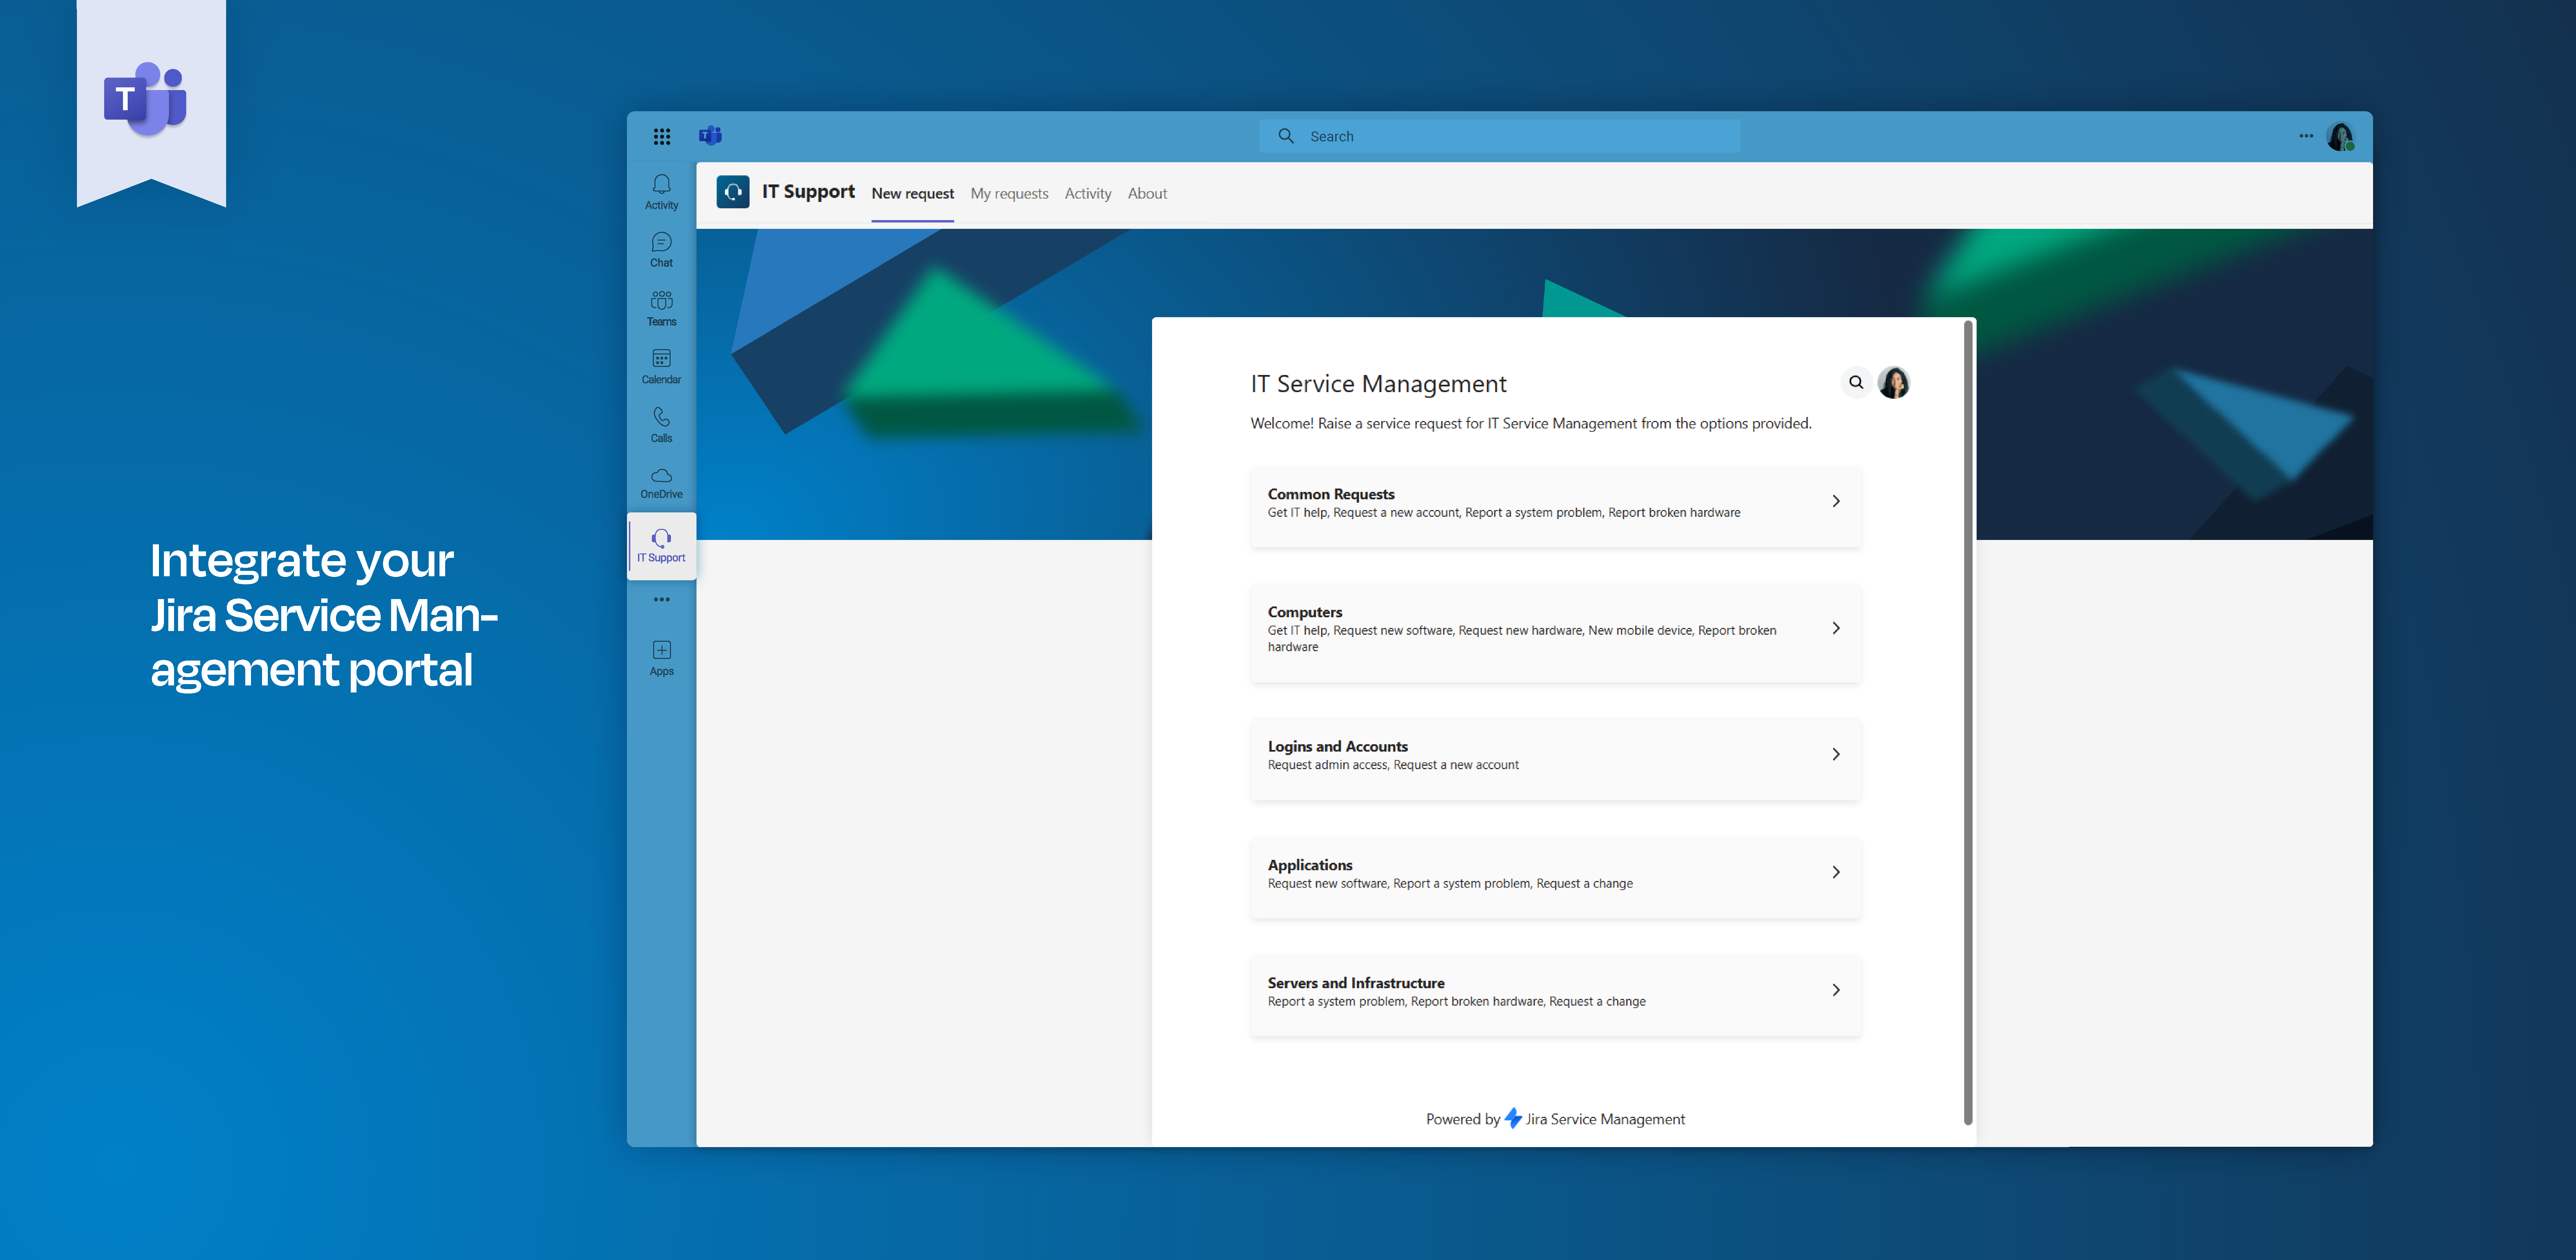
After installing the portal in your MS Teams, you will be able to use JSM features right in Microsoft Teams e.g. raising support tickets from MS Teams (see below screenshot).
✅ You can now do the following in Microsoft Teams:
-
Leave Jira comments in your ticket
✅ You can do the following in Jira:
-
Reach out to customers from Jira via Microsoft Teams chat
(this feature does not require the installation of our Smart Connect app)
📌 Please consider the following:
-
The installation of our Smart Connect for Jira app is not a prerequisite for the Teams portal app!
-
The Teams portal app is only required to use JSM features in Microsoft Teams.
-
The Teams portal bot can only be installed in one customer portal in Microsoft Teams (see below).
-
Request notifications for JSM projects are configured via your personal notifications settings in your individual Jira Service Management project. Learn more about request notifications here.
-
Generally, there are different kinds of notification options with our Teams portal app. Learn more about them here.
Teams portal settings
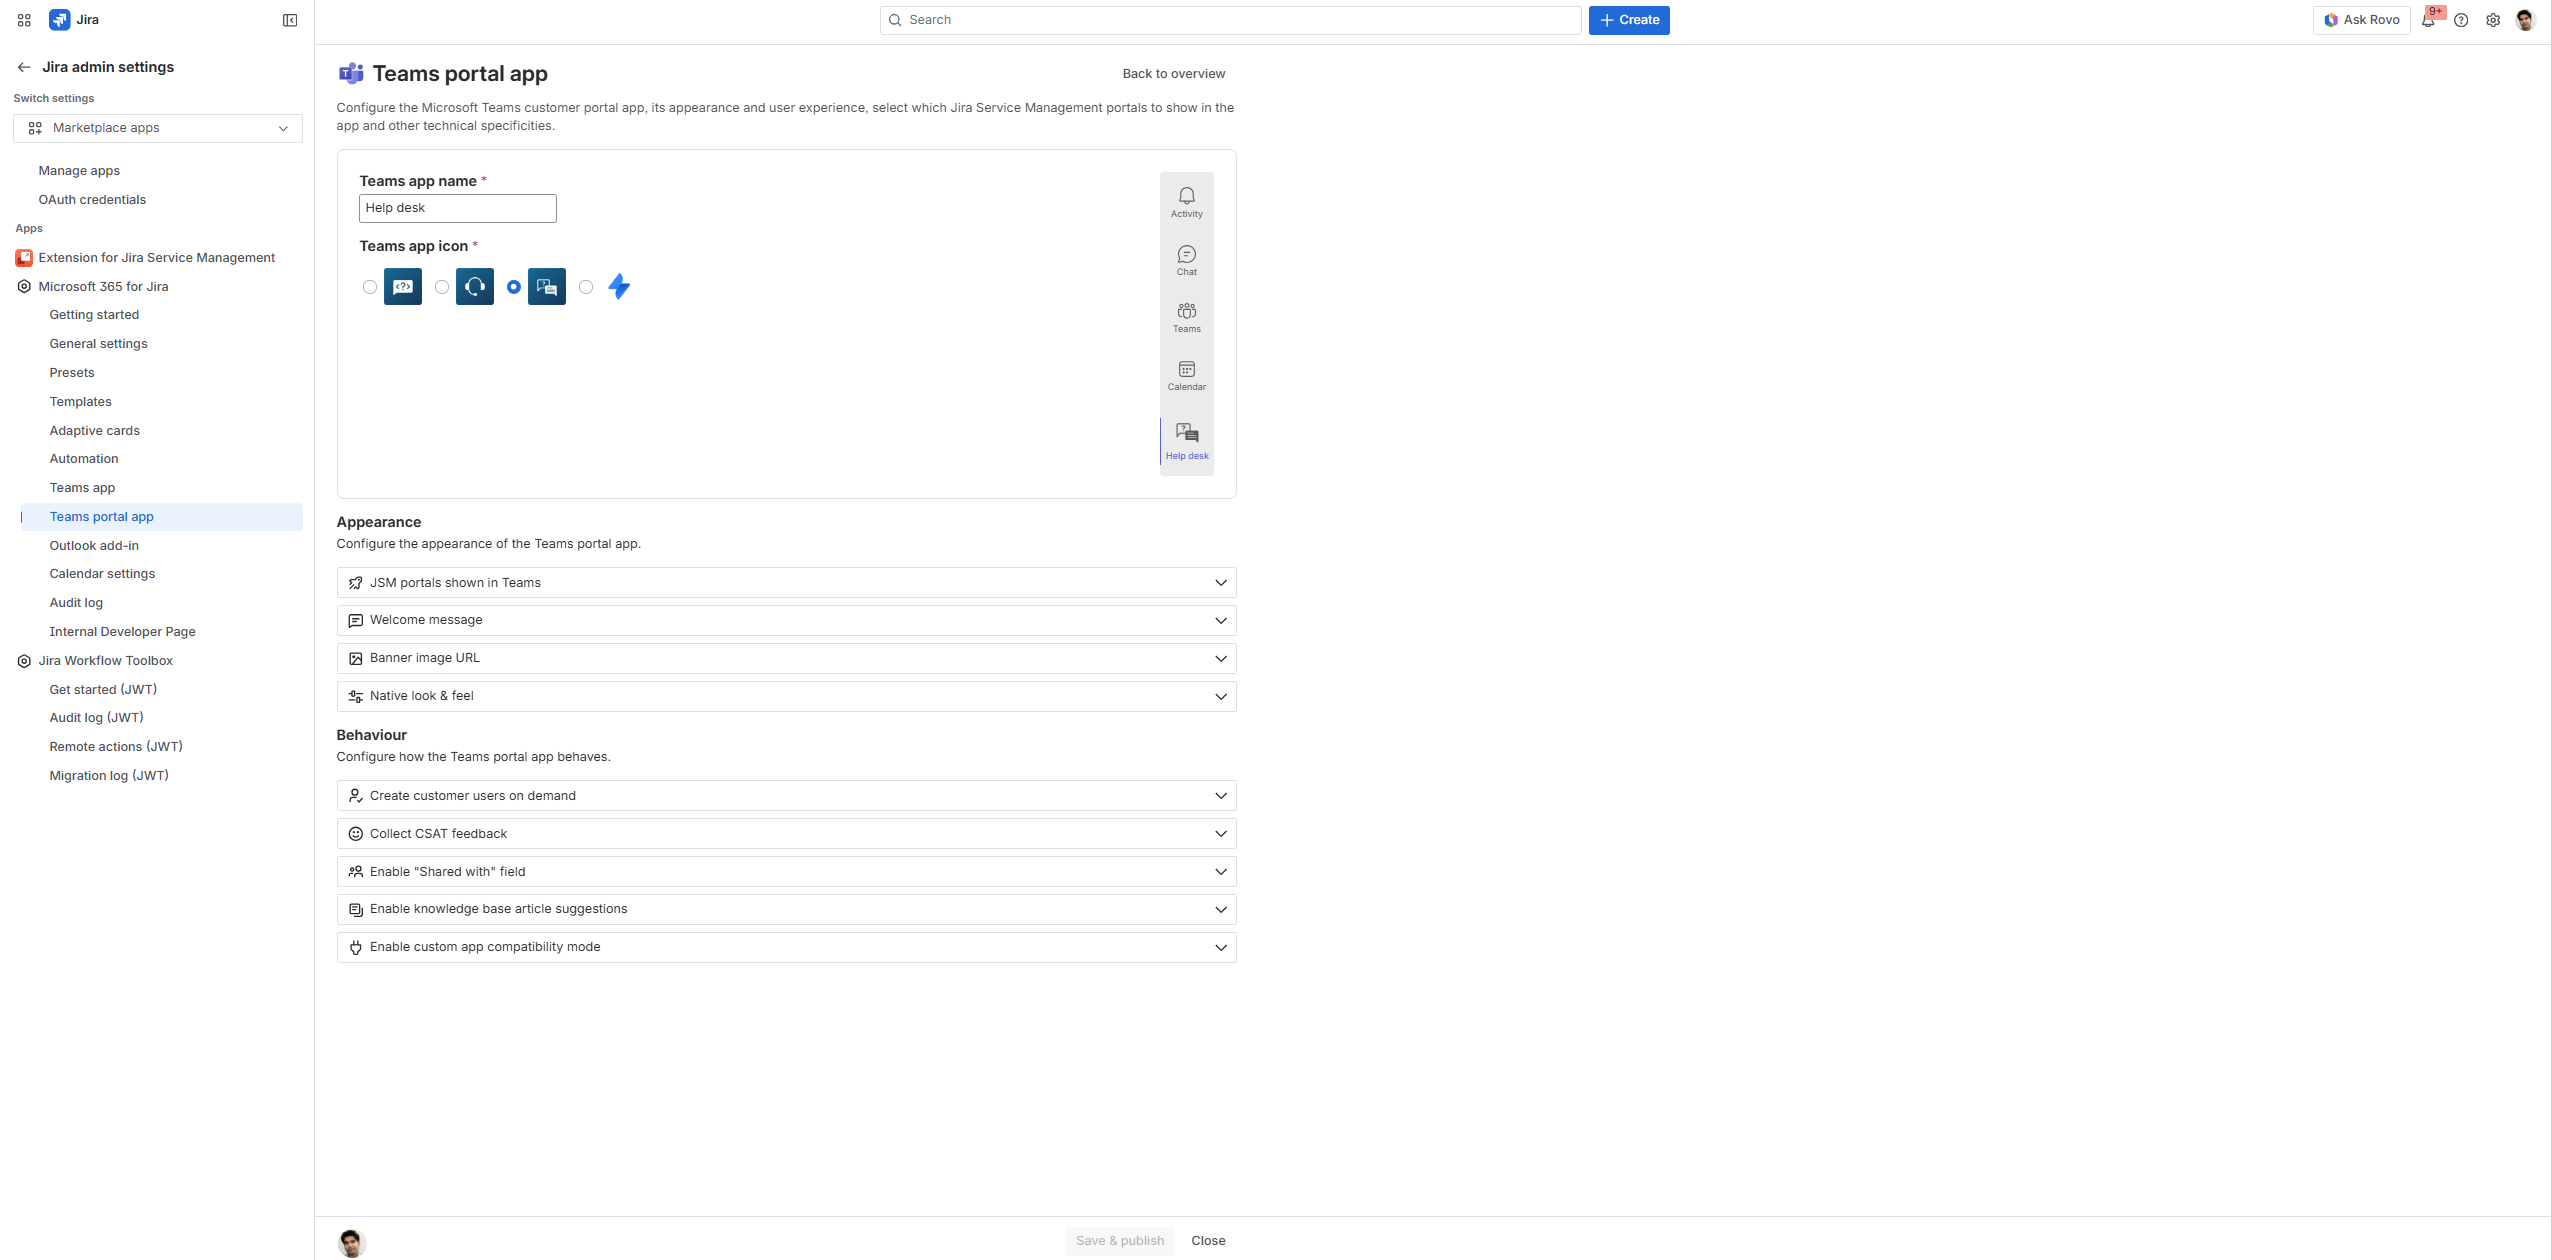
When setting up the Teams portal app for the first time, you’ll need to configure the ‘framework’ first. Read the more detailed explanation of all options in the table below.
Teams portal framework
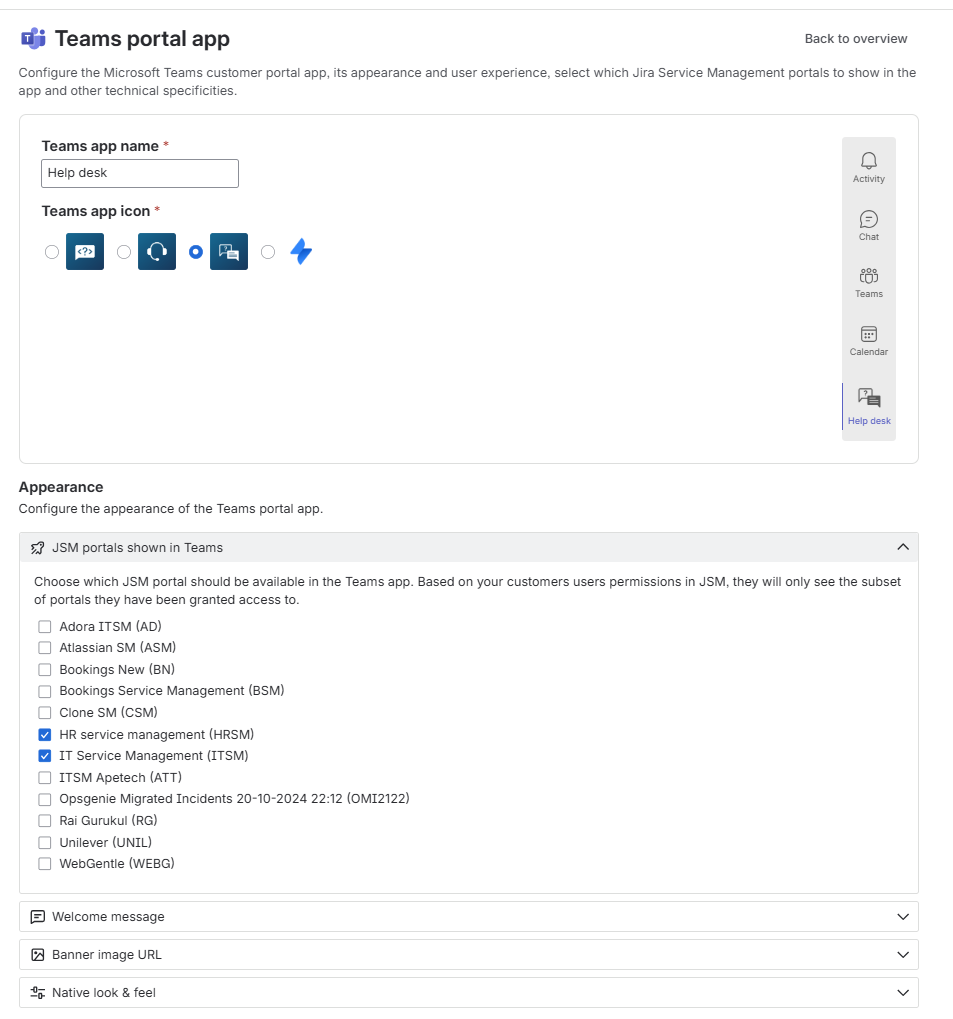
Configure your portal
Set-up the framework of your portal in Microsoft Teams here.
Select a name, choose an icon, and determine which JSM portal you would like to integrate and display in MS Teams.
|
Teams portal app name |
Give your portal a descriptive name that will be displayed in Microsoft Teams. |
|
Teams portal app icon |
Choose from a set of icons for your portal. This icon will be visible in Microsoft Teams sidebar. |
|
Jira Service Management portals shown in Teams |
📌 Please note: Our bot can only be installed in one of your JSM portals. Thus, it is only the connection between this portal and Microsoft Teams. |
|
Welcome message |
Sends a welcome message to the user when installing/deploying the Customer Portal the very first time. Can be used for onboarding the users. |
|
Banner image URL |
Choose a suitable banner image for your portal in Microsoft Teams. |
|
Native portal look & feel
|
As this uses preview/private Atlassian functionality, it’s turned off by default. In case your users expect the portal to look more similar to the original web-based portal (e.g. portal icons, description texts & announcement banners), you can use this option to configure it. After enabling it, you'll need to create a new API key so that we can synchronise the customisations from the web portal. We recommend that you create a service user with access to the portal. (e.g. portal-customization@yourcompany.com) and create the API token using this user. |
Teams portal settings
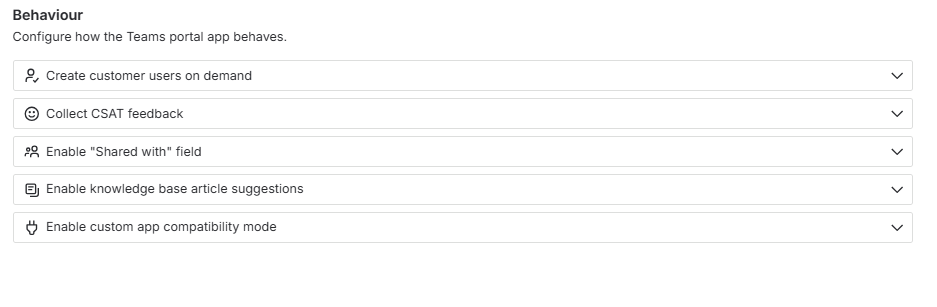
Further configuration
Decide on a few more options for the set-up of your portal in Microsoft Teams.
Learn more on the options and their explanation in the table below.
|
Create portal customers on demand |
In case you don’t sync all your customer users automatically from Microsoft Azure AD, there might be cases where a Teams user does not have a customer user yet. By default, we will create a new customer user on demand, the first time a user accesses the portal from Microsoft Teams. In case you don’t want this, turn this option off. 📌 In this case, the user will see an error message in Teams. Read also: customer single sign on. |
|
Collect CSAT |
requires notifications Enable this option to collect CSAT (Customer satisfaction) feedback after a request is resolved. Ensure that either customer chat or request notifications are enabled for delivery. |
|
Enable “Shared with” field |
Toggling this option on, it will hide the “shared with” field from your create request screen. However, it will be displayed when opening up existing requests under “My requests”. |
|
Enable knowledge base article suggestions |
Whenever a new request is raised, our app automatically refers to your Confluence knowledge base articles to provide a possible solution to their current problem. It's likely that the issue won't be raised at all, as the user may have found an appropriate solution in a Confluence article. However, if you prefer to not see any knowledge base article suggestions in your Teams portal, you can enable this option. |
|
Enable Custom app compatibility mode |
In case you are using apps that rely on a custom UI in the portal, turn on this option to open the final step (creating the request) in a browser pop-up window in Teams. 📌 To learn more about the app compatibility mode, please see the limitation section: App compatibility mode. |
Forms
With the latest version of Microsoft 365 for Jira, Forms are fully supported in your Teams portal app in Microsoft Teams.
Customer portal in Outlook
If you’re using your customer portal in Microsoft Teams, you’re also able to use your customer portal in Outlook.
Request notifications (project settings)
jira project admin
Request notifications are customer-specific and sent either in the bot chat or in the activity tab in Microsoft Teams. These notifications cover status changes, public comments, and approvals.
They can only be configured in the project settings (menu dots next to the project name). Go to “Apps” > “Teams portal app” and turn request notifications on.
📍 To configure request notifications, the Teams portal app must be installed for every notification recipient: follow instructions here.
This is just one of several notification types for JSM projects. Explore all available options here 🚀